How to make the Chadian virtual tour
Contents
- 1 Intro
- 2 Prerequisites
- 3 BUILDING THE TOUR IN PTP2
- 3.1 Define the new project
- 3.2 Create the graphical interface and the actions with your ressources
- 3.3 Build the tour
- 4 IMPORTING THE LIVEPANO
Intro
These are the direct and unedited notes of the person who created the tour, for each and every step.
Hardware used to shoot the ChaDian tour:
- Canon 5D Mk III
- Canon 15mm Fisheye lens
- Nodal Ninja 5 panoramic head
Prerequisites
Before making the tour, I made my own graphical interface on Photoshop, and extracted the different elements to insert in the tour.
The graphical interface: How i want it to look like

Icons and colors defined: My graphical ressources

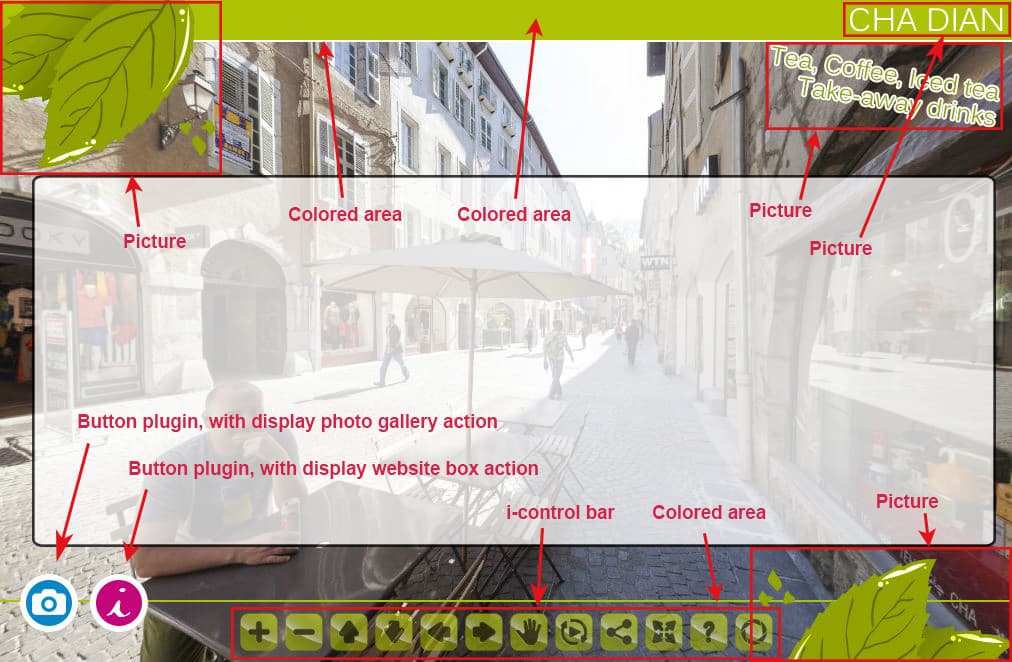
The different elements in PTP2 : How it will be built in PTP2
BUILDING THE TOUR IN PTP2
Define the new project
In HOME tab: "Create an empty Panotour project"
- ...And Upload the panoramas
In TOUR tab: define the project
- Name : Chadian Tea Shop Tour
- Description : details in nexts steps
- Foreground color : #white
- Background color : #aec205 alpha= 150
- Author : Kolor
- Home page : http://www.kolor.com
In TOUR tab: Fill the name of the panoramas:
- In the Shop
- Rue Juiverie
- ...And Set default views
In BUILD tab: Define outpout settings
- Select the outpout folder = Tour Chadian Build
- Fill the filename = index
- Save the project As..
- ...And build the tour a first time
Create the graphical interface and the actions with your ressources
In STYLE tab, Add two hotspot styles:
Default point style (for loading a panorama):
- On the "Default point Spot style" menu on the left side, modify default point:
- Style name : Arrow
- Uncheck icon "from library"
- Icon file: arrow.png
- Check "pause autorotation on hover"
Define a second Default point style (for displaying an image):
On the right side, double-clic on "Default point Spot style" to add another style in the "Spot style menu" (left side):
- Then, modifiy it:
- Style name : Photo
- Uncheck icon "from library"
- Icon file: spot-photo.png
- Pause autorotation on hover
- In Advanced mode : Add an anchor - Bottom
- Check "pause autorotation on hover"
- Choose an action > None immediatly ; we'll define it when the gallery plugin will be created
Modify Default video spot style (preparing a LivePano):
- Uncheck directionnal sound
In TOUR tab, Add the hotspots:
- Add Arrow spot in Street view, define "Arrow spot style" (Green checked Default spot style is automatically applied)
- Add Arrow spot shop view, define "Arrow spot style" (Green checked Default spot style is automatically applied)
- Go back to STYLE TAB, check the "photo spot style" for default (Green check), and come back again in TOUR TAB:
- Add the hotspots (6 here), automatically "Photo spot style" applied, on the view. At any moment, you can select any hotspot and apply another style.
In STYLE tab, Add following plugins:
The Header
Header area:
- Add Plugin Image zone > Colored Area
- Top align
- Color = Background color, alpha=150
- Width=100% / Height=40px
Header area underline:
- Add Plugin Image zone > Colored Area
- Top align
- Offset Y=40px
- Color = Foreground color
- Width=100% / Height=2px
Top Left Leaf picture:
- Add Plugin Image zone > picture
- Offset X=0 Y=0
- File = feuille-haut.png
Top Right Title picture:
- Add Plugin Image zone > Picture
- Topright align
- Offset X=10 Y=8
- File = titre-chadian.png
Top Right Text picture:
- Add Plugin Image zone > Picture
- Topright align
- Offset X=5 Y=45
- File = text.png
- Add Plugin Image zone > Colored Area
- Bottom align
- Offset Y=60
- Color = Background color, alpha=150
- Width=100% / Height=2px
Bottom Right Title picture:
- Add Plugin Image zone > Picture
- Bottom right align
- Offset X=0 Y=0
- File = feuille-bas.png
Control Bar:
- Add Plugin Control bar > i-Control Bar
- Background= Background color +alpha=150
- No prev/next button
- Share button
Photo Gallery button:
- Controls > Simple button
- Align = Left bottom
- Offset X=20 Y=30;
- File=btn-photo.png
- Tooltip = Photo Gallery
Shop Info button:
- Controls > Simple button
- Align = Left bottom
- Offset X=90 Y=30;
- File=btn-info.png
- Tooltip = Shop Info
Actions on Buttons
Social sharing:
Add plugin:
- Viewers > Social share
- Center align, Offset=0/0
- Container color = Project Background color
- Uncheck overlay display
- Check in advanced : "Draggable"
BingMap localisation website box:
1/ Add plugin:
- Viewer > Website box
- Container color = Project background color
- widht=800px height=500px
2/ Click on the Button Info
- Choose an action:
- [Plugin] Website box : Display a website
- Url = http://binged.it/12qFA82
Photo Gallery:
1/ Add plugin:
- Gallery > Gallery
- Container color = Project background color
- Uncheck "Show Overlay"
- Add the picture files (here, 8 files)
2/ Click on the Button Photo Gallery Plugin
- Choose an action:
- [Plugin] Gallery : Open the gallery
3/ Return to Default Hotspot Photo Style
- Choose an action:
- [Plugin] Gallery : Open the gallery on specific image
Add plugin:
- Menu> Context Menu
- Add projection entries: Fiesheye view, Little planet view for example
In TOUR TAB, define photo gallery hotspots:
Header area:
- Edit each photo hotspot to choose an image to display: "Open the gallery on a specific image"
- You have to notice the index reference associated with your picture file;
- The index order in this case : 1,2,3,7,6,5
Build the tour
- Play!
IMPORTING THE LIVEPANO
- File> Import> LivePano
Step 1/5: Select resources
- Select : In the Shop
- Select : Ressources Chadian Livepano/jpg_Ressources Chadian Livepano.pano
- Select : Ressources Chadian Livepano/Livepano_Chadian-cut.mov
Next
Step 2/5: Select reference snapshot
- Select : vlcsnap-00001
Next
Step 3/5: Select crop zone
- Enlarge the window if needed
- Define zone :
- Width = quite maximum, height, include the bottom counter edge
Next
Step 4/5: Define mask
- Mask : bottom counter edge, red boxes, not the ceiling, half ceiling
- Smooth 20%
Next
Step 5/5: Select timeline & render
- Fade in/out : 200ms
- You can crop in the timeline, if this is a rough video..
- Render
- Finish
- Save
- Play!
BACK TO: Documentation / Panotour Documentation