Understanding the detection pipeline
Contents
Control points detection
In an image, all the pixels do not contain much information. For example, a pixel in the middle of a perfectly blue sky can not give precise information on images positions in the panorama.
In this phase Autopano selects the more informative points of each picture, they are the control points or interest points.
Interest points are not all positioned as accurately which gives a variety of RMS in the final result.
![]() It may be that photo does not contain sufficient interesting points. It often happens with long focal lengths in the case of a blue sky, fog, a wall of uniform color or in the unfocused parts. Solutions: use papywizard or a fisheye lens.
It may be that photo does not contain sufficient interesting points. It often happens with long focal lengths in the case of a blue sky, fog, a wall of uniform color or in the unfocused parts. Solutions: use papywizard or a fisheye lens.
Control points description
The visual appearance of each point of the neighbourhood of each interest point is described in the form of a set of numbers that characterize the variation of colors. We call such a set of numbers, the visual signature of the point.
Control points matching
If the visual signatures of two points of interest are similar (their numbers are close) this means that the color variations around them are similar. It is thus assumed this is the same point in the scene that appears in both photos and a correspondence is created between these two points. A set of correspondences between two images is called a link. If two images are linked it means that they must overlap. But, many false matches will be created during this step because very often, many distinct points of a scene are very similar visually, especially in an unnatural environment (building façade, tiling, ...).
![]() If your shoot is in row, column or grid it is important to tell it to the software in detection options, the Autopano will not create links between not adjacent images, and this step will also be faster.
If your shoot is in row, column or grid it is important to tell it to the software in detection options, the Autopano will not create links between not adjacent images, and this step will also be faster.
The detection mode "high" increases both the number of interest points in each image and the number of matches created.
It significantly increases the duration of this stage.
Control points filtering
So far, the correspondences obtained reflect only very local visual similarity between images. For the reasons explained above, it is very common that over 50% of the connections are wrong. If a few of these wrong matches is taken into account in the calibration and positioning of the pictures we may obtain a complete mess. It is therefore essential to distinguish between good and bad matches, it is the role of the filter. To do this it is assumed that the good correspondences are spatially consistent, while the wrong ones are messy. The spatial coherence is defined by a model. Three complementary models are implemented in Autopano:
- similarity: the fastest. It assumes infinite focal length for standard lenses and 180° of FOV for fisheye ones. Particularly suited for medium to long focal standard lenses.
- homographie: slower but necessary for standard lenses of shorter focal lengths or in case of high parallax.
- spherical: suited for fisheye lenses.
![]() Let the software itself choose the method by anabling the automatic mode.
Auto mode chooses the best method to compare each image pair while in manual mode all pairs are treated by the same specified method.
Let the software itself choose the method by anabling the automatic mode.
Auto mode chooses the best method to compare each image pair while in manual mode all pairs are treated by the same specified method.
It may remain wrong matches after this step because it happens that a set of false correspondences are consistent. This is often due to a repetitive structure or a same object into multiple copies in the scene.
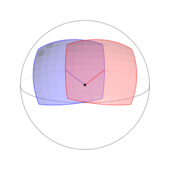
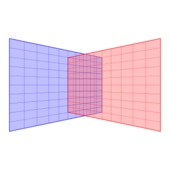
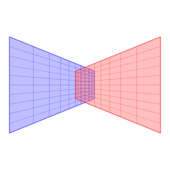
| focal | 60 mm | 35 mm | 25 mm | 15 mm |
| Sphere | 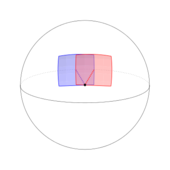
|

|
|

|
| Planar projection | 
|

|
|
|
| Filtering method to use | Similarity | Homography | ||
BACK TO: Documentation / Autopano Documentation