Using Color correction anchors
Contents
Introduction
Taking photos to be assembled into panoramas isn’t complicated, but one (or several) of them may differ from the others in exposure, color, or contrast.
How is it possible to include these photos without affecting the overall appearance of the final panorama?
The Basics
Autopano has a very powerful tool for restoring colorimetric consistency among all the photos in a panorama: color correction anchors.
The anchors allow for several types of corrections. You can correct the exposure, the gamma, or the color tone alone, but you can also use different combinations of these three parameters.
What’s more, you can apply corrections to one localized image, or to all the images in the panorama.
One (or more) “reference photos” are used for comparison when the corrections are applied.
By default, Autopano automatically defines a reference photo and applies a gamma correction (default preferences) to all the other photos.
The default for corrections can, of course, be modified in Preferences, under the Panorama tab.
The default mode for gamma correction is recommended, however, since it produces very satisfactory results.
![]() Notice:
Notice:
It is important to note that anchor modifications made using the Panorama Editor will not correspond completely to the final rendering.
The blend applied in the Panorama Editor is based on the Simple Blend profile (Linear Blender, without Anti-Ghost).
In all cases, if a few small variations in color are still visible in the Editor, the Anti-Ghost Blending Profile (by default) will remove them.
It should be noted that the desired result depends essentially on your own impression. The examples below can be processed in a completely different way.
The main thing is to process the panorama so that it matches your vision.
In this lesson, we will learn how to use color correction anchors in various situations.
Example 1 : Overall Tint
The Shooting
- Equipment: Nikon 5700, automatic mode
- Number of images: 5 handheld photos

Note: Here we can see that view3.jpg tends toward red, and that view4.jpg and view5.jpg have less contrast in the blue tones (sky and sea).
The Stitching
After the panorama is stitched, open Panorama Editor and look at the automatic color correction more closely.
The panorama has the same colorimetric tendencies as the original photos; the red tone is clearly visible in the center of the panorama, and the right side looks washed-out. This is not the desired result.

Default Settings for Correction Anchors
Activate the Correction Anchors tool to see how Autopano applied the correction:

The reference anchor is placed on Image 2. This image will not be modified. All other images are corrected in Gamma (by default).
Image 1 now appears as desired.
Images 3, 4, and 5 are not satisfactory, therefore we will apply other types of correction to these last three.
Anchor Modifications
Image 3:
| We will apply color tone correction in addition to gamma to maintain color consistency and add what was missing before: | After the first modification, the anchor icon has changed, and this image now appears as desired. |

|

|
Image 4:
| Image 4 looks washed-out and its exposure is different from the other images. We will apply Gamma, exposure, and color tone correction: | After modification: |

|

|
Image 5:
| The same correction is applied to Image 4, since these two images are similar. | After modification: |

|

|
Before and After
Now that the corrections have been completed, compare Autopano’s automatic corrections to the manual modifications:

Example 2: Another Overall Tint
The Shooting
- Equipment: Nikon 5700, automatic mode
- Number of images: 6 handheld photos

The photos are very contrasty, and their exposures and color tones are very different from one another. (The shoot was done at sunset, which explains the orange tones).
The stitching
Panorama with automatic color correction applied:

Default Settings for Correction Anchors
Activate the Correction Anchors tool and see how Autopano applied the correction:

The reference anchor is placed on Image 2. This image will not be modified. All other images are corrected for Gamma (by default).
The overall result, however, is not what we had expected.
In this example, we would like to keep the orange color tone from the sunset and restore contrast and details in the sky.
Once again, let’s emphasize that this is a free choice. We could very well have kept this default setting in order to get a different result.
We will modify the anchor and apply different types of corrections.
Anchor Modifications
First, a reference anchor is defined. Here, the anchor is placed on Image 2, which is mostly meadow. The correction applied to the sky looks bad.
Let’s define the reference anchor on Image 5, which is 50% sky.
The detail in the sky has now been restored, however, the mountain looks darker.
To get back the color tonality of the sunset, we will modify all the other images for gamma, exposure and color tone:

Note :
As explained at the beginning of this lesson, the correction applied in the editor is not the final result.
There is still a problem with the sky on the left of the panorama (due to the light being too high). This will be erased by the Multiband blender, coupled with Anti-Ghost.
Before and After
Compare the results of Autopano’s automatic correction to our manual modifications:

Example 3: Correction Anchors and Layers
The Shooting
- Equipment: Canon Ixus 700, auto mode
- Number of images: 38 handheld photos

The stitching
Panorama with automatic color correction applied:

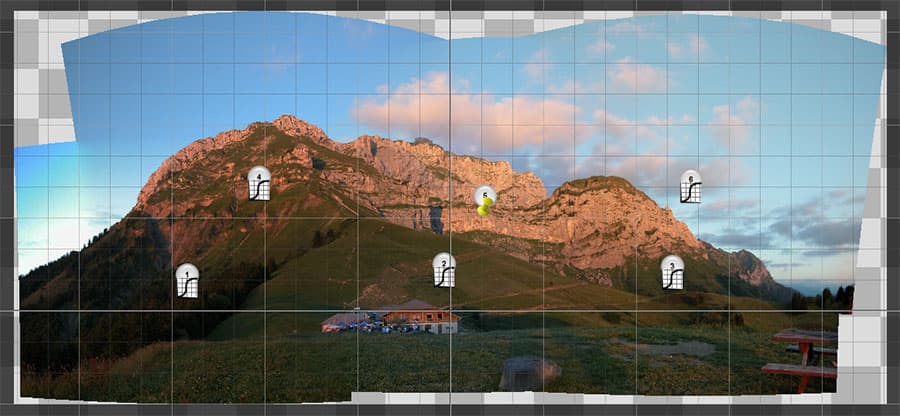
Default Settings for Correction Anchors
Activate the Correction Anchors tool to see how Autopano applied the correction:

In the source photos, the sky was much more contrasty. Here the desired result is a beautiful sky in the upper section of the panorama, and a well-lit lower section.
Modifying the anchors in this configuration will darken or lighten the entire panorama.
Using layers
Autopano allows photos to be combined in layers. The colorimetry can then be corrected differently in each layer, which is quite interesting.
We will create an extra layer in order to sort the photos into two layers, one for the lower part of the panorama, and one for the upper part:
- Lower part : Photos 1-23
- Upper part : Photos 24-38

Note : When the photos are sorted by layers the default anchor settings are preserved.
Anchor Modifications
When using layers, reactivate the Anchor tool and make sure that the option Optimize by layer is active (checked) in anchor properties before you modify the anchors
Upper Section:
There is no reference anchor in this layer. We will add a reference anchor on a photo that contains both sky and clouds.
Surrounding anchor modifications will be based on these two elements when correcting this layer. This will not remove detail, contrast or color tone from the sky or the clouds.
| We will add the reference anchor near the center of the layer | After the first modification: |

|

|
Lower section:
We will modify this image’s reference anchor of and add a reference anchor on either side of this layer in order to apply a gradient with the correction anchors.
| We will modify the reference anchor using a correction anchor, and then add a reference anchor on photos 11 and 23. | After the modification: |

|

|
Note :
As in the other examples, the correction applied in the editor is not the final result.
The dark zones at the extreme right and left of the panorama will be erased by the Multiband mixer coupled with Anti-Ghost.
Before and After
Compare the results of Autopano’s automatic correction to our manual modifications.
