Autopano - Panorama Editor - Layers Editor
Contents
- 1 Principle
- 2 Interface
- 2.1 Toolbar
- 2.1.1 Add images
- 2.1.2 Remove images or layers
- 2.1.3 Image properties
- 2.1.4 Reload Image
- 2.1.5 New layer
- 2.1.6 Reset layer
- 2.1.7 Group by aperture
- 2.1.8 Group by bracket
- 2.1.9 Group by focal length
- 2.1.10 Group by speed
- 2.1.11 Group by stack
- 2.1.12 Display/Hide Exif info
- 2.1.13 Display/Hide Localization info
- 2.1.14 Display/Hide Color info
- 2.2 Layers list
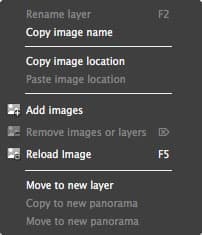
- 2.3 Contextual menu (right click)
- 2.1 Toolbar
Principle
This tool is based on a known fact: many panoramas are made up of images that have common information, the same speed, the same openness or the same focal length.
It is interesting to group images with similar characteristics during the mixing phase and process them as a sub-group (layers).
Beyond common features, the Layers editor allows to group images as you want, for example by separating the panorama at the horizon level, to process the sky separately to the ground.
The use of layers makes sense when stitching bracketed images, where each bracket level can be defined in separate layers, allowing direct blending or an export of each layer.
Each layer is optimized by the use of all constraints and all pictures of all layers. The positions of the images are thus relevant to the whole stitching.
Interface

Toolbar
 Add images
Lets you to add one or more images to the selected layer. Autopano Pro will then integrate this image (or these images) into the panorama preview. You can also use the contextual menu (right click).
 Remove images or layers
Select an image or layer and click on this button to delete it. Autopano Pro will then remove it from the panorama preview. You can also use the delete key or the contextual menu (right click).
 Image properties
Lets you see and change the image properties.
 Reload Image
Reload an image after any changes. This allows you to edit an image in a third-party software, without leaving Autopano and reload it in the panorama editor with changes made.
 New layer
Creates an empty new layer in which you can slide or add images.
 Reset layer
Lets you return to the initial state.
 Group by aperture
Creates layers that depend on the aperture of each image.
 Group by bracket
Creates layers that depend on the bracket of each image.
 Group by focal length
Creates layers that depend on the focal length of each image.
 Group by speed
Creates layers that depend on the speed of each image.
 Group by stack
Creates layers that depend on the stacks of input created images.
 Display/Hide Exif info
Shows/hides Exif information of images (image information source) in the layer list:
- Focal
- Speed
- Aperture
- Iso
 Display/Hide Localization info
Shows/hides Localization information of the images (image information after optimization) in the layer list:
- Yaw: localization on horizontal axis (X)
- Pitch: localization on vertical axis (Y)
- Roll: localization on Z axis
- Fov: field of view
- Computed Focal: computed focal
- K1: 1st order distortion factor
- K2: 2nd order distortion factor
- K3: 3rd order distortion factor
- Offset X: localization difference between the center of the lens and the center of the sensor on the horizontal axis (X)
- Offset Y: localization difference between the center of the lens and the center of the sensor on the vertical axis (Y)
 Display/Hide Color info
Shows/hides the color information of images in the list of layers:
- Color anchor: defined color anchor
Layers list
This area lets you manage the layers and images that form a panorama.

The information used by each image can be seen in independent columns :
- These columns are sort by type (Exif, Localization and Color) that can be displayed/hidden with the


 buttons (located on the right of the toolbar).
- Each of these columns can be sorted by clicking on its title, which quickly shows the logic in a sequence of images.
This window also lets you:
- Move an image from one group to another: Select the desired image and drag & drop to the desired layer.
- Rename a layer: Double-click on the name of the layer so that it can be edited. You can also use the contextual menu (right click).
- Show/Hide an image/layer in the preview:
- Lets you display or hide an image or a layer in the preview of the panorama, just check / uncheck the image or layer.
- This function is applicable only for the preview of the panorama editor and not for the rendering. If you do not want an image to be viewed in the rendering, delete it.
- Lets you display or hide an image or a layer in the preview of the panorama, just check / uncheck the image or layer.
|
Rename layer: Lets you rename the layer. Copy image name: Lets copy the name of the selected image(s)
Paste image location: Lets paste the location of the selected image(s)
Remove images or layer: Lets you delete images or layers. This works the same way as the Delete images tool. Reload Image: Reload an image after any changes. This allows you to edit an image in a third-party software, without leaving Autopano and reload it in the panorama editor with changes made.
Copy to new panorama: Copies the current selection to a new panorama. The latter will open in the panorama window. Move to new panorama: Lets you move the current selection into a new panorama. The latter will open in the panorama window. |
BACK TO: Documentation / Autopano Documentation