Autopano Brenizer Method
Contents
Introduction
You dream of a high end full frame DSLR or, even better, a medium format camera? Don't worry, you can get a better result with your own camera using the Brenizer method. Ryan Brenizer is a wedding photographer (http://ryanbrenizer.com/), inventor of the same named method, which consists in taking multiple pictures of a subject with a "long focal" (above 100 mm) and stitch them to get large frame with a shallow deep of field. This is what a lot of photographers are looking for, especially in portrait photography, and it can also add an artistic touch to your landscape pictures.

Concept overwiew
As we say two pictures are worth a thousand words, so here is a comparison between a classic picture, taken in one shot, and the same scene from the same point of view, captured using the Brenizer method:

|
Single shot
One picture taken with a Nikon D5100 and a Nikkor 18-200 mm VR at 22 mm f/3.5 (33 mm eq. 35 mm) |
|---|---|

|
Brenizer method
39 pictures stitched with Autopano Giga taken with a Nikon D800 and a Nikkor 70-200 mm VR at 200 mm f/2.8 |
Advantages of the Brenizer method
- The final result looks like a picture taken with a very large sensor and/or a very fast lens (aperture < f/1)
- Very high resolution pictures
- Wide field of view with shallow deep of field
- Beautiful Bokeh (depending on your lens diaphragm)
How to use the Brenizer method
This method consists in two main steps: the shooting and the stitching. I'm going to show you how to do it through the making-of the picture above.
The shooting
The shooting method is the same as a the one used for panoramic photography. You have to get rid of the parallax error by using a panoramic head or a long focal and a subject far from you. But first, you need a subject!
About the hardware
You can use any camera, that has a manual mode, from the smallest "point and shoot" to the biggest DSLR including the mirror-less product line. If you are looking from a shallow deep of field prefer a fast and long focal lens. And, do not forget: the closer you are to your subject the shallower is your deep of field.

|
Here I've used:
|
Set your camera for the point of interest of your photography :
- use the Manual mode
- set and lock your focal length if your are using a zoom, use the longest one for better results
- set and lock the exposure : aperture, sensibility (ISO) and shutter speed
- set and lock the focus
How to shoot?
For better results and easier stitching it could be helpful to capture the scene following one of these layouts:
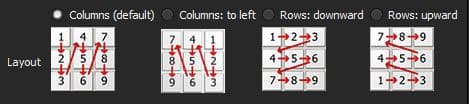
This is highly recommended because image stitching software won't be able to detect accurate correspondences in very blurred images. Thus it will be easier for you to manually place your pictures not automatically stitched.
In my example I've shot 3 lines of 13 pictures from the bottom left corner to the top right corner:

As you see my background pictures are very blurry (that's what we are looking for!) but that is not a problem at all, they will be manually placed and blend in order that borders between images will be completely invisible:


Stitching your pictures in Autopano
The main workflow is the same as for every panorama, go to the Autopano Documentation if you are not comfortable with our software. Drag & drop your images in Autopano, or use the "Gigapan Import wizard" if you shot your images following one of the previously mentioned layouts.
Launch the detection and go in the editor.
In my case I have links wherever there are enough details and the blurred images are automatically placed following my shooting scheme:

If your images are not automatically placed use the "Move images mode" or enter the correct variables (Yaw, Pitch, Roll) in the layer window. The focal length and the distortion coefficients (K1, K2 and K3) are the same for all your images because the lens haven't change during the shooting. You do not need to be very accurate in the placement of your blurred images because the blending will make any border perfectly invisible.
Once you are satisfied with your image in Autopano render it out. As you can see the output resolution is quite impressive, 50800 x 16600 pixels in my case for 39 pictures:

And here is the final result with a 100% crop:

What are my equivalent focal length and aperture
You can estimate the equivalent lens (focal length and aperture) corresponding to your stitched image using the "Brenizer Method Calculation - By Brett Maxwell". I used this calculator in my case and i got a equivalent lens of 33.09 mm opened at f/0.463, which is very impressive!

Other examples
Click to enlarge and fully enjoy the rendering of the Brenizer method!


Have fun using the Brenizer method with Autopano!