Using Anti-Ghost
Contents
The concept
Anti-Ghost is the smart image-cutting algorithm (first appeared in Autopano 2.5).
During the blend of stitched images, the layered pixels are not necessarily identical.
This can be caused by stitching problems (when nodal point is not respected, when lens distortion is hard to correct...) and/or from objects in the picture moving between shots.
The Anti-Ghost is designed to find a cutting path between images in order to avoid blending pixels that don’t match.
The “smart” part is choosing a cut that preserves the integrity of the photographed subjects as much as possible.
Introduction
This new algorithm replaces the cutting step performed by Smartblend before Autopano 2.5 was released.
The results are not always perfect (or don’t always look quite as we expected), we will show a few possibilities that can help guide cutting decisions.
The giga-advantage of the new algorithm is that it can handle Gigapixel images, which Smartblend can’t do. The last part will illustrate this using the image Paris 26 gigapixels.
Manually Adjusting Anti-Ghost
For illustrating anti-ghost adjustments, we will work with following project which represent a biker in action with a lot of de-ghosting possibilities.
 |
Following picture is the default rendering computed by Autopano. We can't really said why a biker is kept and not another one but proposed result do not have ghosting issue.
 |
Even if the result is satisfying, we will show how to guide Autopano in his choices.
Choosing images
When there are sufficient areas of overlap, it is often useful to delete certain images in order to facilitate Anti-Ghost’s selections.

|
With fewer constraints to reconcile, the panorama now appears as expected.
 |
Mask edition tool
![]()
![]() Autopano Giga only
Autopano Giga only
Now we will keep all pictures and act with markers of mask tools to guide anti-ghost choices.
Mask tool is often confused with a painter tool, but it's not. Is more powerful on simple case but can be less intuitive in hard cases (see next session).
Just add few green markers on the biker you want to keep.
 |
If you don't mind which biker to keep but you know that you don't want a particular one use red marker.
 |
This tool is powerful because it does not require a lot work to select or erase an object.
 |
As said before this tools is really efficient on simple case. For smart cutting algorithm, a simple case is when objects can be entirely kept or remove without contradiction (on object is already cut on full input picture, two kept objects are overlapped...).
More difficult cases
When we want to keep overlapped a painted tool can be more intuitive but it's not impossible to use the mask tool of Autopano.
To illustrate difficult cases, we just take two picture of previous project. We want to keep the yellow biker of the first picture and the black one of the second picture.
 |
 |
We obtain this result.
 |
We can remark that black biker of the first picture is not entirely removed. It just because this solution does not exist, we don't have alternative choice for the wheel.
The simple solution for keeping the two bikers does not exits because they are overlapped. In this case, it's important to guide the smart cutting and indicate where we want to do the cut. This done by the close green markers : the first one on the short of the yellow biker and the second one on the wheel of black biker. To guide for keeping close object of different pictures allow to guide where the cut must be done.
Mistakes to avoid
Classic mistake is to consider markers as «pinholes» on a layer mask. Anti-ghost is a smart and complex algorithm that detects paths in the image, only few markers properly placed are required. If results are not what you expected, try to move the markers to a more relevant place.
Adding an alpha layer
For very difficult case or users who prefer use a painter-like tool, it's possible to use external painter tool for guiding smart cutting:
Anti-Ghost through transparency painting
Color Correction influence
When there is not as much overlap as in the previous example, it is not possible to delete an image in its entirety to guide Anti-Ghost:
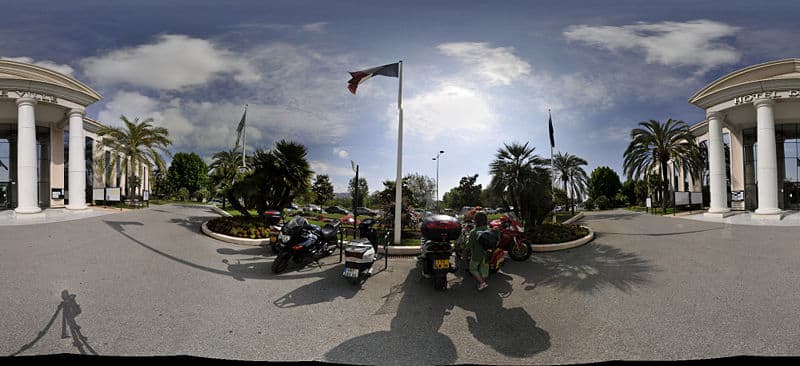
In the picture below, a moving flag is situated in an area of overlap. Unlike the previous example, it is not possible to delete an image without drastically altering the overall panorama.
 |
Here is the rendering obtained when color correction is not applied:
Anti-Ghost chose to keep the flag from the image of the zenith (image 7), whereas we would prefer to keep the one from the central image (image 1).
In addition, this cutting selection does not compensate for the fit error around the flagpole.
 |
This time, if we apply color correction, Anti-Ghost’s choices are different and yield the visual result we expected:
 |
It’s partly by chance that color correction makes it possible to keep the right flag. But what’s interesting here is to understand how color correction influenced Anti-Ghost’s choice:
In order to select the best cutting path, the algorithm is based on analysis of the differences between the images. When there are differences in exposure and/or white balance between two images, Anti-Ghost is forced to find the cutting path in the places where the images are alike.
In the first example, without color correction, the hue of the sky in the zenith (image 7) is quite different from the hue in the central image (image 1). Therefore it’s less of a problem to make a cutting error involving a few pixels around the flagpole than to keep compounding differences by trying to blend the sky.
In the second example, color correction makes it possible to harmonize the hues in the sky, meaning it’s less of a problem to cut in the sky. Anti-Ghost chooses to cut the sky rather than cutting around the flagpole, where the adjustment error is now more difficult.
Using Gigapixel
As stated in the introduction, the new Anti-Ghost can be applied to Gigapixel images. We rendered the image Paris 26 Gigapixels, originally created with Autopano 2.0, using Autopano 2.5.
This image will soon be available on a new site. Meanwhile, here are some screenshots of the new rendering.
You can try finding these screenshots in the original image if you would like to compare the results: Paris 26 Gigapixels
The first two captures illustrate Anti-Ghost’s effectiveness. Vehicles and people were retained in their entirety. Blurry zones appearing in the rendering created with Autopano 2.0 are gone.
 |
 |
This last screenshot shows that some errors still remain. This is generally because some problems still can’t be solved:
The front end of an object appears in a non-overlapping zone (which must be retained) but the other end doesn’t appear in the adjacent image because in a Gigapixel image, the time gap between shots of adjacent images can be very long.
 |