How to make the Panoramic 73 virtual tour
Contents
- 1 Intro
- 2 Prerequisites
- 3 The graphical interface : How i want it to look like
- 4 Icons and colors defined : My graphical ressources
- 5 The different elements in PTP2 : How it will be built in PTP2
- 6 BUILDING THE TOUR IN PTP2
- 7 IMPORTING A LIVEPANO
Intro
These are the direct and unedited notes of the person who created the tour, for each and every step.
Prerequisites
Before to make the tour, i made my own graphical interface on Photoshop, and extracted the different elements to insert in the tour.
The graphical interface : How i want it to look like
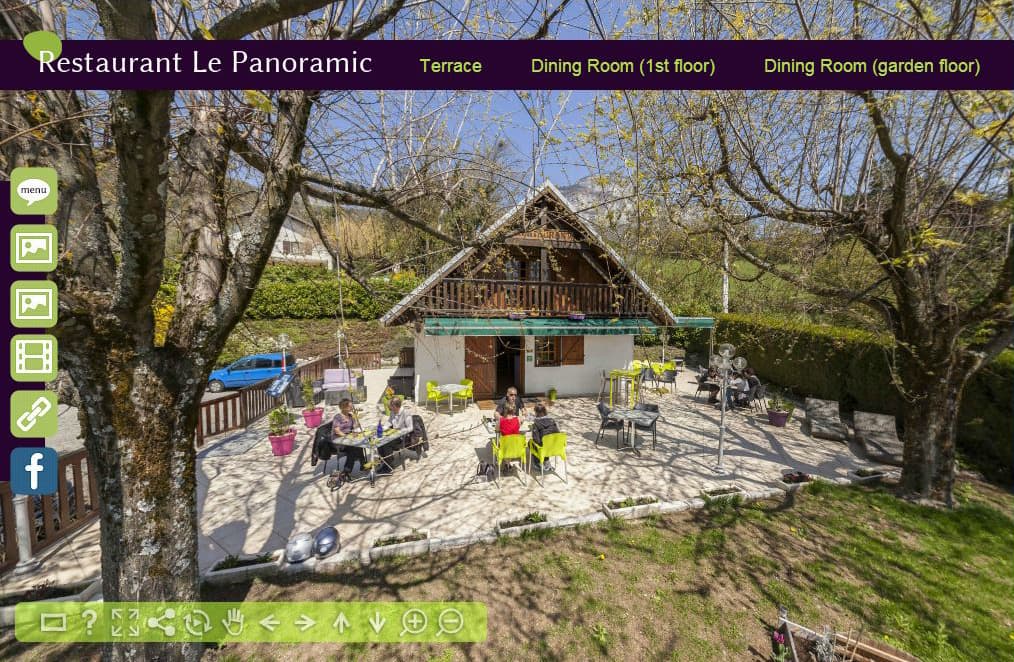
Icons and colors defined : My graphical ressources

- Plus one HTML formatted text file, for the Dishes Menu to display
The different elements in PTP2 : How it will be built in PTP2

BUILDING THE TOUR IN PTP2
Define the new project
In HOME TAB: "Create an empty Panotour project"
- ...And Upload the panoramas
In TOUR TAB : define the project
- Name : Restaurant Le Panoramic
- Description : details in nexts steps
- Foreground color : #b2df48 + Alpha 200 (vert)
- Background color : #27042e (violet)
- Author : Kolor
- Home page : http://www.kolor.com
In TOUR TAB : Fill the name of the panoramas:
- Terrace
- Dining Room (garden floor)
- Dining Room (1st floor)
- ...And Set default views
In BUILD TAB : Define outpout settings
- Select the outpout folder = Tour Panoramic build
- Fill the filename = index
- Save the project As..
- ...And build the tour a first time
Create the graphical interface and the actions with your ressources
In STYLE TAB , Add following plugins:
The Header
Header area:
- Add Plugin Image zone > Colored Area
- Top align
- Offset Y=40
- Color = Background color
- Width=100% / Height=50px
Top right Menu:
- Add Plugin Menu > Panorama menu
- Right Top - Horizontal
- Offset X=5 Y=44
- Display all panoramas
- Background color > Project background color
- Font style= Arial
- Font size=18
- Font color = Foreground color - Alpha = 200
- Button spacer = 0
- Border radius = 0
Top left Restaurant Title:
- Add Plugin Image zone > picture
- Offset = X10 Y10
- File = panoramic-titre.png
Control Bar:
- Add Plugin Control bar > Classic Control Bar
- Bottom left - Horizontal
- Offset = X15 Y20
- Foreground = white
- Background= foreground color
- No prev/next button
- Share button
The Left MenuU
Background area:
- Image zone>colored area, left,
- offset=X0,Y0 ,
- height=300 width=45 color=background color
- Controls>button, left,
- X10 Y-140;
- file=menu.png
- tooltip=Restaurant menu page
Dishes Gallery button:
- Controls>button, left,
- X10 Y-83;
- file=gallery.png
- tooltip=Dishes Gallery
Restaurant Gallery button:
- Controls>button, left,
- X10 Y-27;
- file=gallery.png
- tooltip=Restaurant Gallery
Video button
- Controls > button, left,
- X10 Y27;
- File=film.png
- Tooltip : Jeune Talent 2012: Sîon Evans
Restaurant website button:
- Controls>button, left,
- X10 Y83;
- file=link.png
- tooltip=Panoramic 73 website
Facebook page button:
- Controls>button, left,
- X10 Y140;
- file=fb.png
- tooltip=Panoramic 73 Facebook page
Actions on Buttons
1/ TOUR TAB
- Description Field : Edit a new text, or paste a html text here
2/ STYLE TAB
- Text zone > Description,
- Align = center
- Display : Current project
- Background color = Project foreground color (vert)
- Border radius = 15px
- Area width = 70% / height = 60%
- Advanced = close on click
- Use animation to show : 500ms / by Top
3/ Click on the Button Menu page Plugin
- Choose an action:
- [Plugin] Description : Display a description
Dishes Gallery:
1/ Add plugin:
- Gallery > Gallery
- Container color = Project background color
- Uncheck "Show Overlay"
- Add the picture files
2/ Click on the Button Dishes gallery Plugin
- Choose an action:
- [Plugin] Gallery : Open the gallery
Restaurant Gallery:
1/ Add plugin:
- Gallery > Gallery
- Container color = Project background color
- Uncheck "Show Overlay"
- Add the picture files
2/ Click on the Button Restaurant gallery Plugin
- Choose an action:
- [Plugin] Gallery : Open the gallery
Video Interview:
1/ Add plugin:
- Viewers > Webvideo box
- Container color = Project foreground color / Alpha=200
- Check "Show Title"
2/ Click on the Button Video Plugin
- Choose an action:
- [Plugin] Web video box : Display a video
- URL = http://www.dailymotion.com/video/xnlu64_jeune-talent-2012-sion-evans_lifestyle?start=7#.Ua8gp0Bhh8F
- Title = Jeune Talent 2012: Sîon Evans
Restaurant website:
Click on the Button Restaurant website
- Choose an action: Basic > open a website
- URL = http://www.lepanoramic73.com
Facebook page website:
Click on the Button Facebook page
- Choose an action: Basic > open a website
- URL = https://www.facebook.com/pages/Restaurant-Le-Panoramic-73/203976536283365
Social sharing:
Add plugin:
- Viewers > Social share
- Center align, Offset=0/0
- Container color = Project foreground color
- Check in advanced : "Draggable"
Build the tour
IMPORTING A LIVEPANO
- File> Import> LivePano
Step 1/5 : Select Resources
- Select : Dining Room (garden floor)
- Select : Ressources Panoramic LivePano/JPG/JPG_Ressources Panoramic LivePano.pano
- Select : Ressources Panoramic LivePano/Livepano_Panoramic-cut.mov
Next
Step 2/5 : Select Reference snapshot
- Select : vlcsnap-00001
Next
Step 3/5 : Select crop zone
- Enlarge the window
- Define zone :
- Inclure 2 squares of the windows on the right side, and half of the ground bottom
Next
Step 4/5 : Define Mask
- Masque : ...quite large...
- Smooth 20%
Next
Step 5/5 : Select Timeline & Render
- Fade in/out : 500ms
- Crop the timeine if needed, here it is ok..
- Render
- Finish
- Save
- Play!
BACK TO: Documentation / Panotour Pro 2 Documentation