Panotour - Advanced - Skins Folder
Intro
Each graphic plugin in Panotour Pro is programmed to be able to use skins.
You may have noticed some plugins already come with some supplied (like the Mask or Header plugins), but the point of this tutorial is to show you that you can use your own, and how easily you can add and use them.
Using skins for your plugins is quite useful if you only want to change the graphics of a certain plugin, but don't need to change anything else, it will help you save space in your plugin library without having to create several clones of plugins just to add different images.
The plugins that can use skins are:
- Any control bar
- Previous/Next tabs
- Previous/Next dots
- Previous/Next strips
- Classic Thumbnails Bar
- Simple Thumbnails Bar
- Header
- Footer
- Mask
- Compass
- VR Prev/Next Floating Buttons
How do skins work
Several plugins already have a skins folder so to explain how it works, we are going to have a look at one of Panotour's default plugins that already has skins, the Mask plugin.
To have a look at file composition.
- Open Panotour Pro
- Go to Edit > Open Templates Directory
- Open the plugins folder then mask.
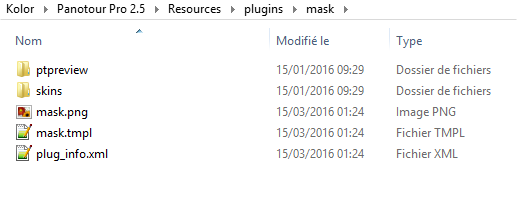
This is what you should see:
- A ptppreview folder
- A skins folder
- A mask.png file
- A mask.tmpl file
- A plug_info.xml file.
The mask.png file is the default shape of the mask, and the other shapes that you can select from Panotour, are located in the skins folder.
If you open the skins folder, you will see several separate folders.

Let's compare the default mask and one of the skins:

Default mask.png

mask.png from the skin "Blurred Heart"
We can see that both masks have:
- The same dimensions (1000x1000px)
- The same base color (#b63513)
- The same file name.
Those are the rules you need to follow if you want to add a skin to one of the plugins.
Rules
To add a skin to your plugin, the skin must:
- Have the same name as the plugin's default image(s) that you want to replace
- Have the same dimensions as the plugin's default image(s)
- Have the same base color as the plugin's default image(s) you want to replace if it is going to be colorizable. Black and white base colors can't be colorized.
Setting up your own skins folder
This folder is not present in every skinnable plugin's folders, but all of those plugins are coded to react and use this skin file if added.
- If you want to add a skin to a default plugin
- Open Panotour > Edit > Open User Directory, then again Panotour > Edit > Open Templates Directory
- Open the plugins folder in the templates directory, find which plugin you want to skin and make note of the folder's name
- Open the plugins folder of your user directory then create a new folder using the same name as the default plugin's folder name
- Create a folder called skins
- In this folder create one new folder per skin
- If you've created a new plugin based on a default one
- Simply create a folder called skins with the rest of your plugin's files
- In this folder create one new folder per skin
Examples
Example 1 - Adding a skin to a default plugin (mask plugin)
This example will add a skin to one of the default Panotour plugins. We'll be adding a skin to the Mask plugin.
- Follow the setup steps for a default Panotour plugin
- Create a folder with your skin name, and place your new mask in it.
- Here I have added a "Smiley" skin

Mask folder in the user directory with a skins folder

My new skins folder "Smiley"

New mask
- After restarting Panotour to load the skin:

In the mask's properties

My new mask in a tour
Example 2 - Adding a skin to a modified plugin (control bar)
This example will use a modified plugin and apply a skin to it. We'll be using the Circles Control Bar which you can download here.
Skinning a control bar allows you to replace a few buttons without having to edit them all, or toggling between different skins using the same base without having several duplicate control bars.
- Follow the setup steps for a custom plugin based on a default Panotour plugin
- Create a folder with your skin name, and place your new icons in it.
- Here I have added a "Sans" skin to my control bar, which will replace all the icons of the control bar with different icons

Skins folder in my control bar files

My new skin folder "Sans"

New icons
- After restarting Panotour to load the skin:

In the control bar's properties

My new icons in a tour
Changing one icon
You can also add a skin just to change one icon in the series, perhaps to make one stick out more than the rest with a different color or shape.
- Follow the setup steps for a custom plugin based on a default Panotour plugin
- Create a folder with your skin name, and place your new icons in it.
- Here I have added a "Smiley" skin to my control bar, which will replace my info icon with a smiley icon instead.
Skins folder in my control bar files

My new skin folder "Smiley"

New info icon
- After restarting Panotour to load the skin:

In the control bar's properties

My new icon in a tour