How to make the Lac du Bourget virtual tour
Contents
- 1 Intro
- 2 Prerequisites
- 3 The graphical interface : How i want it to look like
- 4 Icons and colors defined : My graphical ressources
- 5 The differents element types in PTP2 : How it will be builded in PTP2
- 6 BUILDING THE TOUR IN PTP2
- 6.1 Define the new project
- 6.2 Create the graphical interface and the actions with your ressources
- 6.3 Build the tour
Intro
These are the direct and unedited notes of the person who created the tour, for each and every step.
Prerequisites
Before to make the tour, i made my own graphical interface on Photoshop, and extracted the different elements to insert in the tour.
The graphical interface : How i want it to look like

Icons and colors defined : My graphical ressources
The differents element types in PTP2 : How it will be builded in PTP2
File:BourgetHowTo interface zones.jpg
BUILDING THE TOUR IN PTP2
Define the new project
In HOME TAB: "Create an empty Panotour project"
- ...And Upload the panoramas and Gigapixels
In TOUR TAB : define the project
- Name : Le lac du Bourget à 360°
- Description : Une visite de découverte des alentours du Lac du Bourget
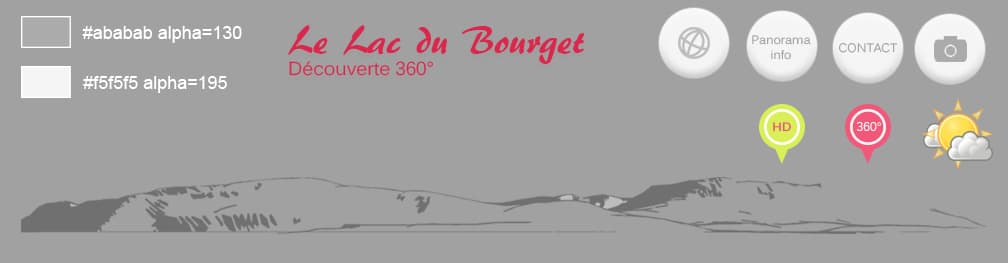
- Foreground color : #ababab alpha=130
- Background color : #f5f5f5 alpha=195
- Author : Kolor
- Home page : http://www.kolor.com
In BUILD TAB : Define outpout settings
- Select the outpout folder = Tour Bourget Build
- Fill the filename = index
- Save the project As..
In TOUR TAB : Define each panorama: name, geotag, description, default view...
- You can name it as you want, or if you named the input files correctly, then the names will be filled automatically
- (List of the group and panorama names we use)
- (List of the descriptions we use)
- Geotag each panorama, check "Generate a hotspot automatically" for add it in the Panotour Maps
- Fill panorama descriptions. We've done it from a edited html file: Le Bourget descriptions.html
- ...Set default views
Create Panorama Groups:
- Create groups of panoramas, gathered by themes
- (List of the group and panorama names we use)
- Define Group colors : #f5f5f5 (foreground)
- ...And build the tour a first time
Create the graphical interface and the actions with your ressources
In STYLE TAB, Add two hotspot styles:
Default point style (for loading a panorama):
- On the "Default point Spot style" menu on the left side, modify default point:
- Style name : 360 spot
- Uncheck icon "from library"
- Icon file: spot-360.png
- In Advanced mode : Add an anchor - Bottom
- Check "pause autorotation on hover"
- Tooltip name: %p
- Add ACTION : Action> Plugin Control> Display tour information
Define a second Default point style (for displaying an image):
On the right side, double-clic on "Default point Spot style" to add another style in the "Spot style menu" (left side):
- Then, modifiy it:
- Style name : Giga spot
- Uncheck icon "from library"
- Icon file: spoy-hd.png
- Pause autorotation on hover
- In Advanced mode : Add an anchor - Bottom
- Check "pause autorotation on hover"
- Tooltip name: %p
- Add ACTION : Action> Plugin Control> Display tour information
In TOUR TAB, Add the hotspots:
- Panorama after panorama, add 360 hotspots and link it to other,
- Then, change the default hotspot style, switch to Giga spots, place and link it on the panoramas
In STYLE TAB, Add following plugins:
The Header
Header area:
- Add Plugin Image zone > Colored Area
- Top align
- Color = Background color
- Width=100% / Height=90px
Header area underline:
- Add Plugin Image zone > Colored Area
- Top align
- Offset Y=90px
- Color = #c4de23
- Width=100% / Height=2px
Top Summits picture:
- Add Plugin Image zone > picture
- Offset X=0 Y=18
- File = profil-sommets.png
Top Logo Title:
- Add Plugin Image zone > Logo
- Top align
- Offset X=0 Y=25
- File = titre-lac.png
- Hide when hiding controls
Button CONTACT:
- Name= Button CONTACT
- Controls > Simple button
- Align = Right Top
- Offset X=10 Y=10;
- File=btn_contact.png
- Tooltip = Get some informations
Button METEO:
- Name= Button1 METEO
- Controls > Simple button
- Align = Right Top
- Offset X=100 Y=10;
- File=btn_meteo.png
- Tooltip = Meteo
Button MAP:
- Name= Toggle Button MAP
- Controls > Toggle button
- Align = Right Top
- Offset X=190 Y=10;
- File=btn_map.png
- Tooltip = Show/Hide Map
- Action Triggered on click (first state): Plugincontrol > Show Map
- Action Triggered on click (second state): Plugincontrol > Hide Map
Button INFO:
- Name= Button2 INFO
- Controls > Simple button
- Align = Left Top
- Offset X=10 Y=10;
- File=btn_info.png
- Tooltip = Show view point info
- Add Plugin Image zone > Colored Area
- Bottom align
- Color = background color
- Width=100% / Height=60px
- Add Plugin Image zone > Colored Area
- Bottom align
- Offset Y=60px
- Color = #c4de23
- Width=100% / Height=2px
Control Bar:
- Add Plugin Control bar > i-Control Bar
- Foreground= Foregroundcolor +alpha=150
- Background= alpha=0
- Uncheck Display tooltips
- Uncheck Display Thumbnails
- No Prev/Nexy
- No Help
- Share button
- Enable Gyroscope
Actions on Buttons
PANOTOUR MAPS:
1/ Add plugin:
- Maps > Panotour Maps
- "Next to the tour" (default choice)
- Layer = Openstreetmap, Road
- Uncheck "Display radar"
- Spot : Tooltip type = Tooltip on hover
2/ Click on the Button MAP
- Choose an action:
- [Plugin] Plugincontrol : Show Map on first state
- [Plugin] Plugincontrol : Hide Map on second state
METEO is a website box:
1/ Add plugin:
- Viewer > Website box
- Display = center
- Container color = Project background color
- widht=900px height=600px
- Uncheck overlay display
2/ Click on the Button METEO
- Choose an action:
- [Plugin] Website box : Display a website
- Url = http://france.meteofrance.com/france/meteo?PREVISIONS_PORTLET.path=previsionsville/730080
SOCIAL sharing:
Add plugin:
- Viewers > Social share
- Center align, Offset=0/0
- Container color = Project Background color
- Uncheck overlay display
- Check in advanced : "Draggable"
CONTACT Information (Description):
1/ Add plugin:
- Text zone > Description
- Name= Description PROJECT
- Display = Bottom Left
- Offset X=0 Y=92
- Display Current PROJECT Description
- Container color = Project background color, alpha = 180
- Area width = 100% height = 130px
- Hide when hiding controls
- Close description on click
Animation from left 300ms
2/ Click on the Button INFO
- Choose an action:
- [Plugin] Description PROJECT : Display a description
PANORAMAS Information (Description):
1/ Add plugin:
- Text zone > Description
- Name= Description INFO
- Display = TopLeft
- Offset X=0 Y=92
- Display Current PANORAMA Description
- Container color = Project background color, alpha = 180
- Area width = 100% height = 130px
- Hide when hiding controls
- Close description on click
Animation from left 300ms
2/ Click on the Button INFO
- Choose an action:
- [Plugin] Description INFO : Display a description
Bottom Panoramas MENU:
- Add Plugin Menu > Panorama menu
- Bottom - Horizontal
- Offset X=0 Y=92
- Display all groups and panoramas
- Extend menu to tour size
- Root Background color > #c4de23
- Font style= Arial, default size
- Font color = #747474
- Button spacer = 0
- Border radius = 0
- Thumb size = 120x60
- Hide when hiding controls
Prex/next panorama buttons view:
- Add Plugin Controls > Previous/Next Tabs
- Foreground color= foreground
- Background color= background
Mobile Devices Gyroscope:
- Add User input > Gyroscope
Build the tour
- Play
BACK TO: Documentation / Panotour Pro 2 Documentation