Panotour - Tour - Hotspot editor - Specific editors
Contents
The hotspot editor is the tool that manages interactions between pictures/panoramas/groups in your tour. This page explains the use of the various specific hotspot editors that are available: the Floor Plan hotspot editor and the Web Map hotspot editor.
 Floor Plan Hotspot Editor
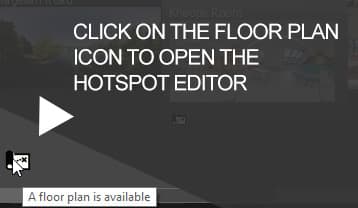
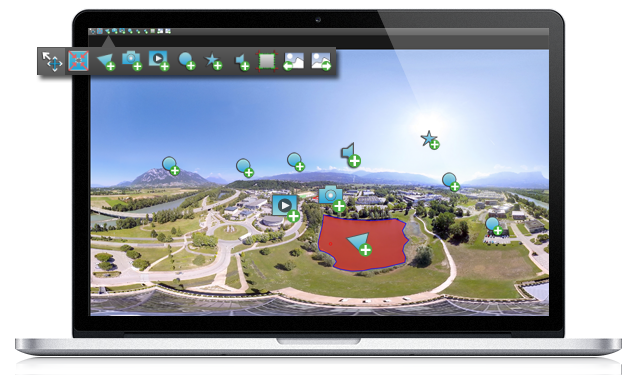
When you are in the Main Workspace of the Tour Tab, you can open the Floor Plan Hotspot Editor by clicking on the bottom left floor plan icon ![]() .
.
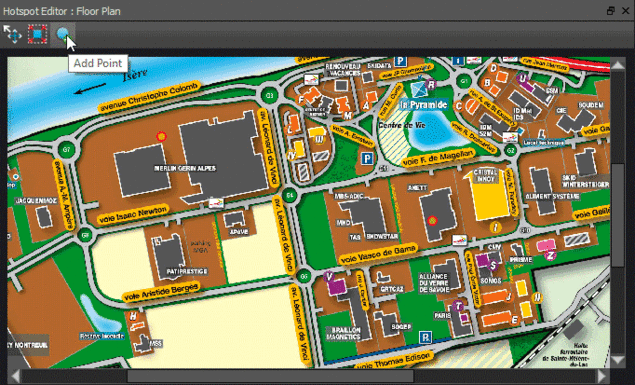
When a group or a project is selected, you can assign a floor plan to it. Panotour Pro allows you to add Point Spots to your floor plans. The floor plan allows your visitors to easily and quickly know their current position in the tour and then make your tour more convenient to navigate through. See also Map Point Style.
How to use the Floor Plan Hotspot Editor in Panotour 2
- How to add a Floor Plan to a group of pictures/panoramas
- How to add spots to the Floor Plan
- How to move spots in the Floor Plan
- How to delete spots in the Floor Plan
- How to add a Floor Plan to the Project
- How to customize tooltips displayed when user hovers a Floor Plan spot
- See the example/test project
Style
Click to assign a style to your Map Spot Style. You can add and customize your own styles of map spots. See also Map Point Style.
Display Parameters
Tooltip: Enter text displayed when your visitor hovers a floor plan hotspot.
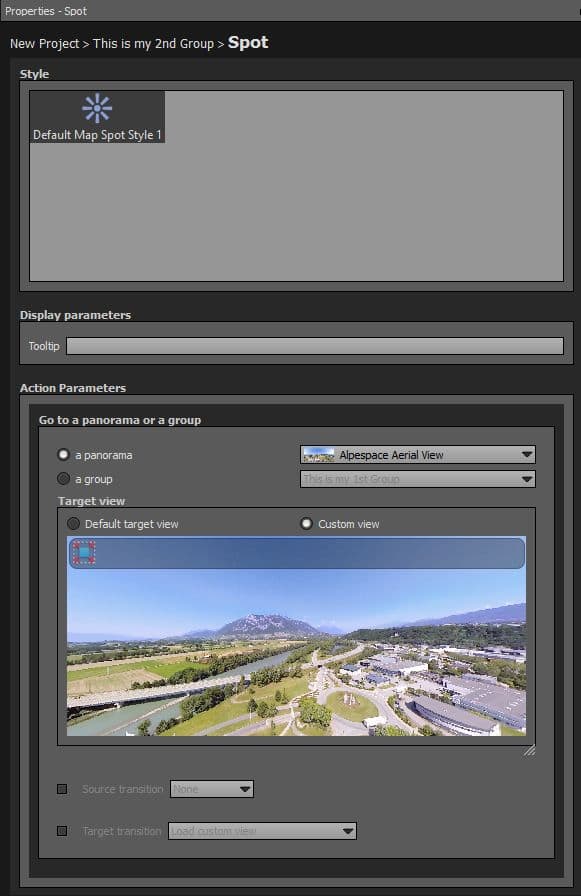
Action Parameters
- Dynamic area directly in relation with actions set up in Style tab.
- Default actions parameters appear but you can customize your own in Style tab.
- By default, basic floor plan hotspot is set to the action "Go to a panorama or a group".
- Select hotspot action you wish to assign to the visitor's click.
See also Actions.
Target View
This section is available only when «A panorama» is selected.
- Default Target View: The target view is applied when your visitor land on the target picture/panorama.
- Custom View: You can specify a target view position on the target picture/panorama by dragging it to the position you wish in the preview window.
See also Actions.
Source Transition
When checked, source transition uses only the following parameters and bypasses the point style.
- None: On click, go directly to the target even if a default action is defined in point style.
- Zoom In on the Spot: Add a «Zoom in» effect to the hotspot point and then go to the target.
- Zoom Out: Add a «Zoom out» effect and then go to the target.
Target Transition
When checked, target transition uses only the following parameters and bypasses the point style.
- None: Landing on the target, no action is run on the target panorama even if an action is defined in point style.
- Custom View To Panorama View: Go to the target with custom view first and pan to the panorama view (defined in the target panorama).
- Load Custom View: Go to the target custom view.
- Load Panorama View: Go to the target panorama view (defined in the target panorama).
- Panorama View To Custom View: Go to the target with panorama view first(defined in the target panorama) and pan to the custom view.
Web Map Hotspot Editor
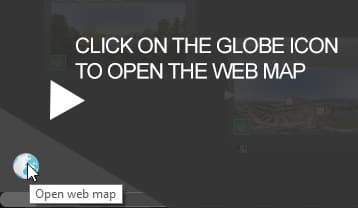
When you are in the Main Workspace of the Tour tab, you can open the Web Map by clicking on the bottom left globe icon ![]() .
.
The Web Map can display all hotspots generated from panoramas locations (from Geolocalisation) set on your tour. This real map can be set to Google Maps, Bing Maps (for user only) or OpenStreetMaps. This editor gathers all the hotspots generated automatically in Pictures/Panoramas Properties > Geolocalisation and allows you to add independent point hotspots. See also Map Point Style.
How to use the Web Map Hotspot Editor in Panotour Pro 2
- Presentation
- Geolocate Menu
- Use exact Latitude and Longitude and DMS
- Using Address
- Zoom and Center
- Change Provider
- Add Point Spots
- Spot Properties
- Geolocate Tool for a Picture/Panorama
- Meanings of Green/Red Antennas Icons in the Main Workspace
- Blue Hotspots on the Web Map
- Results on the Web Map of 2 Panoramas Geotagged
- Set Default Web Map View
- Results for the Default View Set of the Web Map in PanotourMaps Plugin
- Geolocate Tool of a Group
- Results of 3 Hotspots placed on the Web Map and seen in PanotourMaps Plugin
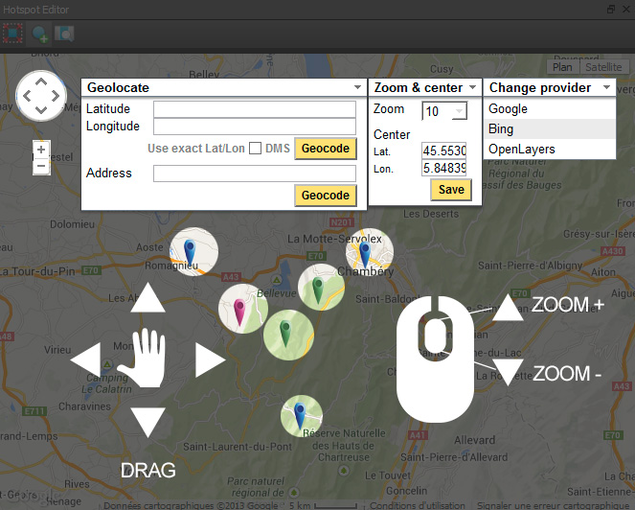
- With your Mouse: Drag the map to place and center it according to your needs.
- With your Mouse Wheel: Use your mouse wheel to zoom in or zoom out.
Interface
- Fullscreen

- Click on this icon to toggle the hotspot editor fullscreen.
- Add Point

- Places markers on the map which you can assign:
- Style: Choose a style from your Map Point Styles.
- Tooltip: Tooltip to display.
- Action Parameters: Dynamically dependent on Map Spot Style. See also Actions.
- Default View

- Click on this icon to set the current view to the default view.
- Drag and Zoom: Use your mouse to drag the map and mouse wheel to zoom in and out.
- Blue Hotspots

- Automatically generated hotspots Pictures/Panoramas Properties > Geolocalisation. Note that when you click on a blue hotspot, nothing happens because the spot is locked. Blue spots are read only markers.
- Note: The Geolocated spots will always use your default map spot style, you can not assign several spot styles to geolocated spots even if the interface seems to allow this.
- Green Hotspots

- Manually added hotspots in the Web Map Hotspot Editor.
- Red Hotspot

- Current hotspot selection.
- +: Zoom in button.
- -: Zoom out button.
- Up Down Left Right arrows: Buttons to drag the map.
- Geolocate
- Latitude: Enter the latitude to which you want to center the map.
- Longitude: Enter the longitude to which you want to center the map.
- Use exact Lat/Lon: Check this checkbox to force map provider to center the map on the latitude and longitude you entered. If not checked, the map is centered to the nearest road.
- DMS/DD Toggle: Toggles between Degrees/Minutes/Seconds and Decimal Degrees geolocalisation mode.
- Geocode: Button to validate latitude and longitude you entered. Clicking on this button will place a hotspot on the Web Map.
- Address: Enter for example the name of the city or place you wish to display on the map, you can also enter streets name.
- Geocode: Button to validate the address you entered.
- Zoom & Center
- Zoom: Select the zoom level you wish for the map.
- Center Lat.: Displays in realtime the map center latitude.
- Center Lon.: Displays in realtime the map center longitude.
- Save: Click on this button when you are on your desired map position to define the default view.
- Change Provider
- Google: Displays Google Maps.
- Bing: Displays Bing Maps. Using Bing Maps in Panotour requires a map key which is free: See how to get an API key for Bing Maps here. This API Key is not the same as the API Key of the generated virtual tour which is separated. This Bing API Key is only required for the Web Map Hotspot Editor in Panotour Pro. Once you get your Bing API Key, enter it in Panotour Preferences
- OpenLayers: Displays OpenLayers Maps.
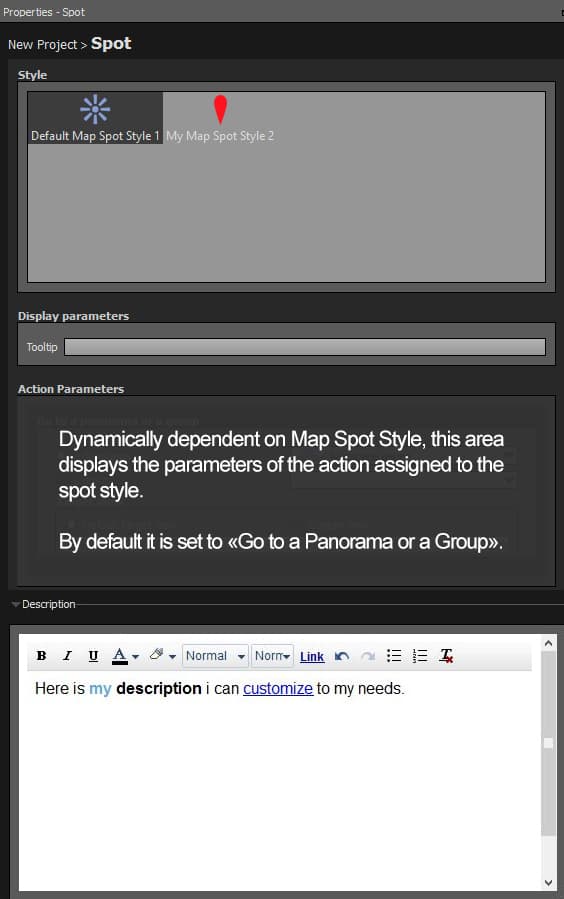
Style
Apply a style to your spot. You can add and customize as much as you want Map Spot Styles in the Spot Style Editor. See also Map Point Style.
Display Parameters
Customizes the tooltip you wish to display when user hovers the marker spot. Note that tooltip behavior may vary according to the PanotourMaps Plugin settings.
Action Parameters
Dynamically dependent on Map Spot Style, this area displays the parameters of the action assigned to the spot style. By default it is set to «Go to a Panorama or a Group». See also Actions.
Description
The Description field can be displayed in different ways. Even if description field is completed, you may not see it appear unless you call it through an action. To learn more about actions, see Plugins in the Style tab. Description contains a built in WYSIWYG Editor that can customize and add HTML features to your text like:
- Text formatting and style (Bold, Italic, Underline, Color, Font Family, Font Size).
- HTML features for enhanced text (Links, Unordered Lists, Ordered Lists).
- Undo/Redo function.
- Remove formatting function.
BACK TO: Documentation / Panotour Documentation